
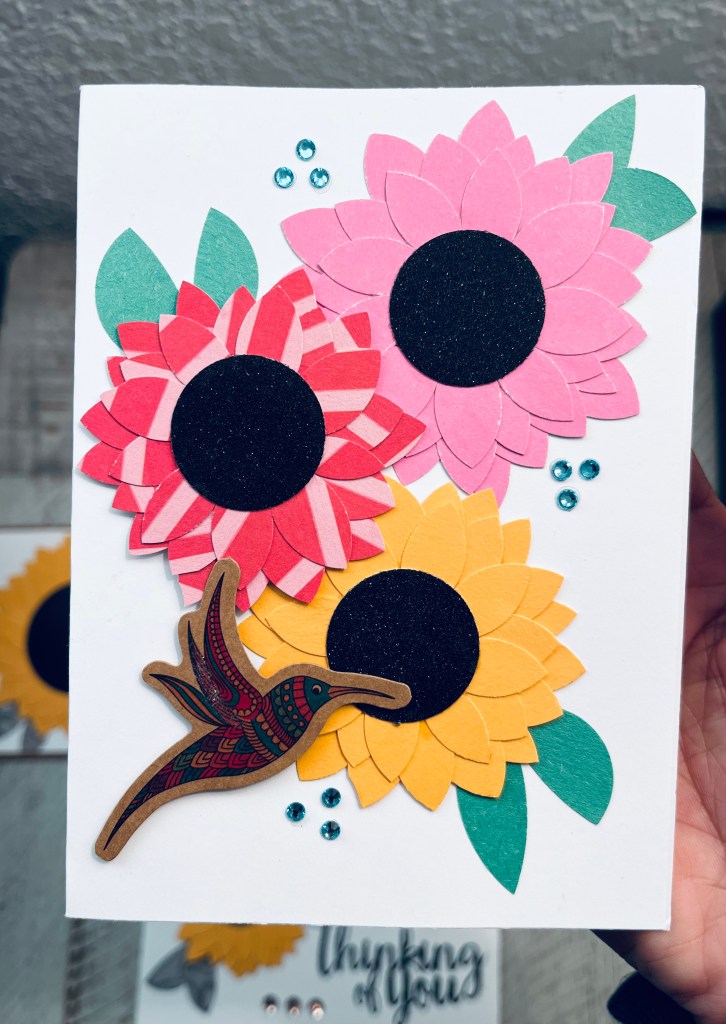
Delight your friend, colleague or loved one with this handmade sunflower card. With delicately layered paper petals organized in various layouts, these sunflowers are sure to make someone pause and smile. The beauty of this project is that you can still do this even if all you have is paper, glue and scissors. We can’t wait to mail or hand these set of flower cards out!
This sunflower-themed card project is great for anyone with leftover paper scraps (calling all crafters!) All the paper flowers we feature here use paper petals punched out from leftover manila envelopes, patterned scraps, and leftover cardstock. You can use whatever you have on hand including construction paper, designs inspired from mailers, or even gift bags. Anything goes. Beautifully designed paper is everywhere, including your mail. It’s just waiting for you to pick up and use.

Let’s talk about the craft supplies we used to make the petals. At A Series By Liz and Angie, we love challenging ourselves with other ways to do more with craft supplies. After all, as much as we love our local craft stores (and Amazon), we can’t always blow our budget on new craft supplies. So until our next planned purchase, we wanted to dig through our supplies for what we have and then creatively use it.
In this instance, we used a circle paper punch rather than a scissor to make the petals. We first used a circle punch to punch out paper circles. We then went back and used that same tool to punch out petal shapes. Layer all the petals around the flower’s center and a sunflower emerged!
If all you have are scissors, you can still do this! Read below for instructions on how we designed these cards.

Instructions for How to create a Sunflower Card
Note: For this particular project, we use circle paper punches to make petals. But feel free to use scissors or petal die cuts if you don’t have paper punches on hand.
You Will Need:
- A plain blank card (or more if you are making a set like us)
- Patterned, textured, or any colored paper from your craft stash:
- For the petals: sunflowers come in a variety of colors including yellows, oranges, golds and even deep purples and mahogany. So start with these colors in mind for your flowers. But feel free to experiment with different patterned paper and colors. For example, our color scheme is based on the typical marigold yellows you see in sunflowers. But we ventured into pinks and reds as part of our color palette and it worked out!
- For the center of the flower, we used glittery black cardstock for added texture and glam to the center disc of the flower. But you can use browns, dark yellows or similar.
- For leaves: green hues for leaves.
- Tools:
- A circle punch that is up to 2 inches in diameter will work well for this project.
- Optional: A bigger circle punch to create the sunflower head.
- Scissors
- Other supplies needed:
- Glue
- Any other embellishments you would like to add (stickers, gems, foam adhesives, sentiments etc.)
Instructions to make one multi-layered paper flower:
- Use a circle punch to punch out 16 circles with the paper of your choice.
- Grab the circle punch and one paper circle. Place part of the paper circle under the punch die (almost halfway) and press down to punch out a shape that resembles a petal. Rotate the paper under the punch to make a second petal. You should be able to punch out at least 2 oblong leaf-shaped paper petals from 1 circle. Tip: you may need to flip the circle punch upside down to see what shape will be created when you use the punch. Petals can be as wide or small as you prefer depending on where it is punched.
- Repeat steps #2 for all 16 circles. You should be able to create 32 petals. If you need more, repeat the steps above.
- Next, cut out a bigger circle for the center of the flower. If you have a larger circle punch, use that to cut out a center.
- When it’s time to arrange the petals, start arranging the first layer of petals behind the flower’s center in a clockwise direction. We used about 8 petals per layer; but this varies depending on how big the flower’s center circle is. When satisfied, glue each petal behind the flower’s center.
- Take your next set of 8 petals and start arranging another layer of petals behind the previous layer, carefully filling in gaps and ensuring that the top of the second layer of petals can still be seen. When satisfied, glue it behind that previous layer.
- Repeat Step #6 to complete additional layers of petals.
- Optional: create leaves using this technique and tuck it behind each flower.
Layout Tips for Card Designs:
- Glue a group of 3-5 flowers to create a colorful garden bouquet.
- Create one large flower as a focal point and tuck in a sentiment such as “just a note” or “hello”.
- Enhance your card’s theme by adding some garden life to your card. Use bird or bee stickers or cutouts.
- Use foam adhesive dots or squares behind your flowers or garden life elements to make your card more three-dimensional.
- Add embellishments like gems to give your cards a little more sparkle.
As a side note, we didn’t add any sentiments inside. Our cards were blank on the inside so we can use them for different occasions.
All in all, we really had fun conceptualizing and making these sunflower cards out of our existing paper stash and supplies.
We hope you consider making this sunflower card. You may surprise yourself as you create beauty out of your scraps. So much so that you may just want to keep these for yourself!
What other flower cards should we do next? Until next time!
